Estimated reading time: 11 minutes
Are you familiar with this? You're looking for your keys, your wallet or just want to know if the car is still where you parked it. But instead of a quick answer, the app marathon begins: open Apple „Where is?“ for the iPad, start Samsung SmartThings for the key tag and check Google's „Find my device“ for the second cell phone. It's annoying!
As smart home enthusiasts, we want to have everything in one place. This dream was recently realized in the Home Assistant Community on Reddit shared. The good news is that you can now turn this dream into reality.
In this ultimate guide, I'll show you how to use the trackers from Google, Samsung and co. in a single, beautiful dashboard in Home Assistant unite. Get ready for a little tinkering adventure - it gets a bit more technical, especially with Google, but it's worth the effort!
For detailed instructions and explanations of all configuration options, I recommend watching the YouTube video linked below. This video goes into detail about each individual setting, providing you with comprehensive instructions on how to set everything up correctly. Any code from the video can be found in this article, so you can use it directly without having to type it out.
What you need for this project
Before we dive deep into the configuration, let's quickly check your toolbox. You will need:
- A little patience and fun with YAML code.
- An ongoing Home Assistant instance (best installed with HACS).
- Tracker in the Samsung SmartThings universe (e.g. Galaxy SmartTags).
- And/or devices in the Google Find My Device Network.
- A PC/Mac with a Python environment (only mandatory for Google integration).
What is Home Assistant?
Home Assistant is an open-source platform for home automation that aims to connect all devices in the home and control them centrally. It was developed to provide a unified user interface and simple, flexible control for a wide range of smart home devices from different ecosystems. Here are some points in favor of Home Assistant:
- CompatibilityHome Assistant supports thousands of devices and services from various manufacturers, including lighting, air conditioning, heating, cameras, weather sensors, voice assistants and more.
- Local controlUnlike many commercial smart home platforms that rely on cloud services, Home Assistant runs locally on your network. This means increased privacy and reliability, as your smart home devices work even without an active internet connection.
- Automation and scenesOne of the main features of Home Assistant is the ability to create complex automations and scenarios. For example, you can have lights turn on automatically when it gets dark, or turn on the heating when the temperature drops below a certain level.
- Simple user interfaceHome Assistant offers a user-friendly interface that makes it easy to monitor and control devices. This interface is fully customizable.
- Integration with voice assistantsHome Assistant can be integrated with voice assistants such as Amazon Alexa or Google Assistant to enable voice-controlled control of your smart home devices.
- Open source and community-drivenSince Home Assistant is open source, it is supported by an active community that is constantly developing new integrations and improving existing ones.
- Data protection and securityAs a locally running platform, Home Assistant has the advantage that the data remains within its own network. This protects privacy and increases security compared to cloud-based solutions.
In summary, Home Assistant is a powerful and flexible solution for those who want to design their own smart home and control their devices centrally, regardless of the manufacturer or ecosystem.
Installation of HACS and integration of GoogleFindMy-Card in Home Assistant
Step 1: Installing HACS in Home Assistant
Home Assistant Community Store (HACS) is a custom add-on for Home Assistant that provides access to a variety of custom integrations and plugins developed by the community. How to install HACS:
- Check requirements: Make sure that your Home Assistant is ideally up to date.
- Download Execute scriptOpen a terminal for the Docker container version or the core version.
- Docker: Dial into the container with:
docker exec -it homeassistant bashor (similar) - Core: Switch to the user who is running Home Assistant
- Execute the following command for both variants:
wget -O - https://get.hacs.xyz | bash -
- Docker: Dial into the container with:
- Restarting the Home Assistant: After the files have been copied, restart Home Assistant.
- Integrate HACS into Home AssistantGo to „Configuration“ > „Integrations“ > „Add“ in the Home Assistant interface and search for HACS. Add it and enter your GitHub token if prompted.
For the supervised version, please refer to the Documentation of HACS itself to read about the installation.
Step 2: Add GoogleFindMy-Card integration via HACS
Once HACS is installed, you can simply add GoogleFindMy-Card:
- Open HACS: Go to HACS in the Home Assistant interface.
- Search for integrationClick on „Integrations“ and use the search function to search for „GoogleFindMy-Card“.
- Install GoogleFindMy-CardFind GoogleFindMy-Card in the list and click on „Install“. This will add the integration to your Home Assistant.
- Restarting the Home Assistant: Start Home Assistant again to apply the changes.
- Configure GoogleFindMy-CardAfter restarting, you can set up and customize GoogleFindMy-Card via „Configuration“ > „Integrations“ in Home Assistant.
Conclusion
With these steps, you have successfully installed HACS in your Home Assistant and added GoogleFindMy-Card integration. This powerful combination opens up a world of additional features and customizations that have been and are being developed by the Home Assistant community. More blog posts and videos on useful integrations to follow. If you don't want to miss out, subscribe to my YouTube channel!
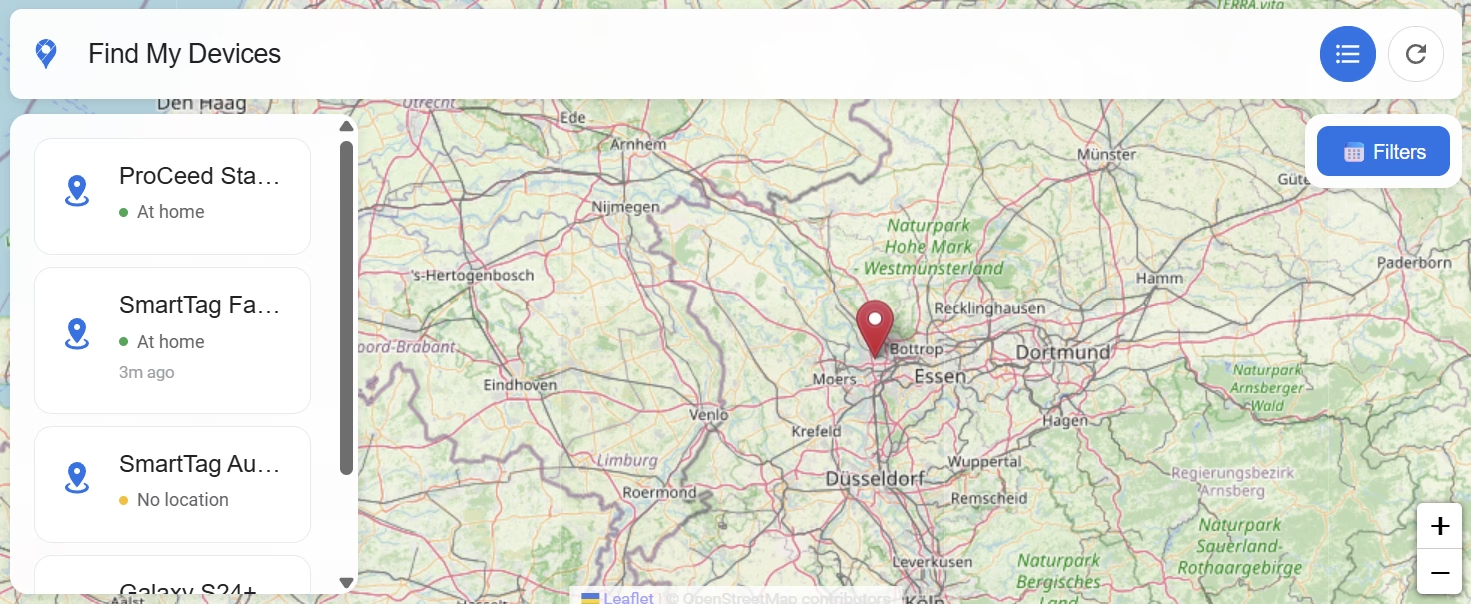
The heart of our dashboard is the visual display. Instead of boring lists, we want an interactive map with smart device icons, battery status and the exact address.
Here comes the GoogleFindMy-Card from BSkando into play. Although the name contains „Google“, this card is incredibly flexible and also eats the data from your Samsung trackers!
Part 2: Integrate Samsung SmartThings Find
Let's start with the simpler part. Samsung has a fairly open structure for SmartThings, which makes integration much more relaxed for us. We use the custom integration for this HA-SmartThings-Find from PixelShober.
Step-by-step to Samsung integration:
Add HACS repository: Go to „Integrations“ in HACS, add https://github.com/PixelShober/HA-SmartThings-Find as a custom repository, download the integration and restart Home Assistant.
Start integration: In Home Assistant, go to Settings > Devices & services > Add integration and search for „SmartThings Find“ (do not confuse this with the official SmartThings integration!).
The login workaround:
- In the configuration window in Home Assistant, you will now see a Link to the Samsung registration page displayed.
- Open this link in a desktop browser (e.g. Chrome or Edge).
- Important: Before you log in, press F12, to open the developer tools (DevTools) of your browser and switch to the tab „Network“ (Network).
- Now log in as normal with your Samsung account.
Extract the token:
- After logging in, the page will probably load endlessly or remain white - that is completely normal!
- Now look in your network tab in the developer tools. Search for a failed or canceled request (this often starts with
S-1-...or similar). - Click on this request and search in the „Headers“ area for a link that starts with
ms-app://begins. This is the redirect link that contains your authentication token. - Copy this complete
ms-app://...URL.
Degree in Home Assistant:
- Go back to Home Assistant and paste this copied URL into the corresponding field in the configuration.
Within seconds, your Galaxy SmartTags and linked Samsung devices should appear as device_tracker-entities appear in Home Assistant.
Tip for everyday life: You can already use these Samsung entities for automations. For example: When the key (SmartTag) leaves the „Home“ zone, lock the smart front door.
Part 3: The final boss - Google Find My in Home Assistant
Google doesn't make it easy for us, as there is no official, simple API for the „Find my device“ network. But don't worry, with the right tools it's absolutely possible. We use the integration GoogleFindMy-HA.
3.1 Installing the integration in Home Assistant
This has now become super easy:
- Open HACS in your sidebar.
- Go to Integrations and search directly for Google Find My. (You no longer need to add a custom repository for this!)
- Click on Download and then restart Home Assistant.
3.2 Preparation on the PC: GoogleFindMyTools
In order for the integration to access your devices, it needs a special authentication file called secrets.json. We generate this file once on your PC.
⚠️ IMPORTANT IN ADVANCE: You need the following on your PC Latest version of Google Chrome. If Chrome is even slightly out of date, the script is guaranteed to fail according to the developer! Python must also be installed.
Step-by-step to the secrets.json:
- Download: Download the help tool GoogleFindMyTools as a ZIP file and unzip it (or use
git clone). - Open terminal: Open your terminal (Mac/Linux) or the command prompt (Windows) and navigate to the unzipped folder:
cd GoogleFindMyTools- (Optional, but clean work) Create a virtual environment:
python -m venv venvAnd activate (Windows: venv\Scripts\activate | Mac/Linux: source venv/bin/activate).
- Install dependencies: Download all necessary packages:
pip install -r requirements.txt- Start script: Execute the main program:
python main.py(Tip: On Mac/Linux possibly python3 main.py use).
3.3 The login process
When you run the script for the first time, it automatically starts an authentication sequence and opens Google Chrome.
Log in there as normal with your Google account (including your 2-factor authentication). As soon as the login was successful, the script retrieves the required access tokens and saves them in a new file called secrets.json in the subfolder Auth/.
3.4 Completion in Home Assistant
This freshly generated secrets.json is your golden key!
Now go to Home Assistant and select Settings > Devices & services > Add integration and search for Google Find My. During setup, you will be asked for the data that is now in your secrets.json are located.
Clever bonus: As the authentication has taken place on your PC and the results are displayed in the secrets.json you can simply use this file (or its contents) for your Home Assistant - even if your Home Assistant runs „headless“ (without monitor and desktop browser) on a Raspberry Pi or mini PC!
Part 4: Combine everything in the dashboard
You've done it! The data from Samsung and Google flows into your system. Now we're building the very dashboard that so many users loved in the Reddit post mentioned at the beginning.
Switch to your Lovelace dashboard, click on „Edit dashboard“ and add a new Manual card added. Here is an example code of how to use the GoogleFindMy-Card to unite both worlds:
type: custom:layout-card
layout_type: masonry
cards:
  - type: custom:googlefindmy-card
    entities:
      - device_tracker.proceed_location
      - device_tracker.smarttag_bicycle
      - device_tracker.smarttag_autoschlussel
      - device_tracker.galaxy_s24_2
    title: Find My Devices
    show_last_seen: true
    show_location_name: true
    show_coordinates: true
    enable_actions: true
    keep_device_list_pinned: false
    show_path_lines: true
    use_leaflet_map: true
    filter_keywords: ""
layout:
  width: 1000
Application examples from everyday life
Why all the effort? Because a centralized Find My dashboard takes your smart home to the next level. Here are three examples of how you can use this data now:
- The „Have I forgotten something?“ check: A tablet at the front door shows you directly when you leave whether your car keys (Samsung Tag) and wallet (Google Tag) are still in the house.
- Theft protection automation: If your car tracker moves out of the „Home“ zone at night between 11 p.m. and 6 a.m., Home Assistant sends a critical alarm to your cell phone.
- Family overview: You and your partner can keep an eye on all your important valuables on a secure dashboard without having to know the login details for each other's ecosystems.
YouTube video implementation
Conclusion
Admittedly: Combining all trackers in Home Assistant is not (yet) a „one-click“ experience. In particular, reading the Google network via a Python environment requires some technical skill and the willingness to run a script in the background.
But the result makes up for everything. When you open your dashboard for the first time, see the Reddit-inspired layout and realize that you have finally tamed Samsung, Google and co. in a single, sovereign view - that's a real smart home success. You have regained full control over your devices!
Try it out, set yourself a few hours time blocker at the weekend and build your ultimate „Find My“ dashboard.
Useful links at a glance
- Inspiration: The original Reddit post
- The UI centerpiece: GoogleFindMy-Card (GitHub)
- Samsung integration: HA-SmartThings-Find (GitHub)
- Google Integration: GoogleFindMy-HA (GitHub)


0 Comments