Estimated reading time: 7 minutes
If you use Home Assistant and have several Wireless switches you know the problem: keystrokes quickly get mixed up, actions overlap - and you lose the overview. This is exactly where the Home Assistant Switch Manager into play. This add-on helps you to manage all button inputs centrally and clearly - without annoying YAML fiddling. Even if there are blueprints for your switch, it's much more complicated than with this great add-on!
For detailed instructions and an explanation of all configuration options, I recommend the YouTube video linked below. In this video, every single setting is explained in detail so that you receive comprehensive instructions for the exact setup. You can find any code from the video in this article so that you can use it directly without having to type it in.
What is Home Assistant?
Home Assistant is an open source platform for home automation that aims to connect and centrally control all devices in the home. It is designed to provide a unified user interface and simple, flexible control for a variety of smart home devices from different ecosystems. Here are some points in favor of Home Assistant:
- CompatibilityHome Assistant supports thousands of devices and services from various manufacturers, including lighting, air conditioning, heating, cameras, weather sensors, voice assistants and more.
- Local controlUnlike many commercial smart home platforms that rely on cloud services, Home Assistant runs locally on your network. This means increased privacy and reliability, as your smart home devices work even without an active internet connection.
- Automation and scenesOne of the main features of Home Assistant is the ability to create complex automations and scenarios. For example, you can have lights switch on automatically when it gets dark or turn on the heating when the temperature falls below a certain level.
- Simple user interfaceHome Assistant offers a user-friendly interface that makes it easy to monitor and control devices. This interface is fully customizable.
- Integration with voice assistantsHome Assistant can be integrated with voice assistants such as Amazon Alexa or Google Assistant to enable voice-controlled control of your smart home devices.
- Open source and community-drivenSince Home Assistant is open source, it is supported by an active community that is constantly developing new integrations and improving existing ones.
- Data protection and securityAs a locally running platform, Home Assistant has the advantage that the data remains within its own network. This protects privacy and increases security compared to cloud-based solutions.
In summary, Home Assistant is a powerful and flexible solution for those who want to design their own smart home and control their devices centrally, regardless of the manufacturer or ecosystem.
What is the Switch Manager anyway?
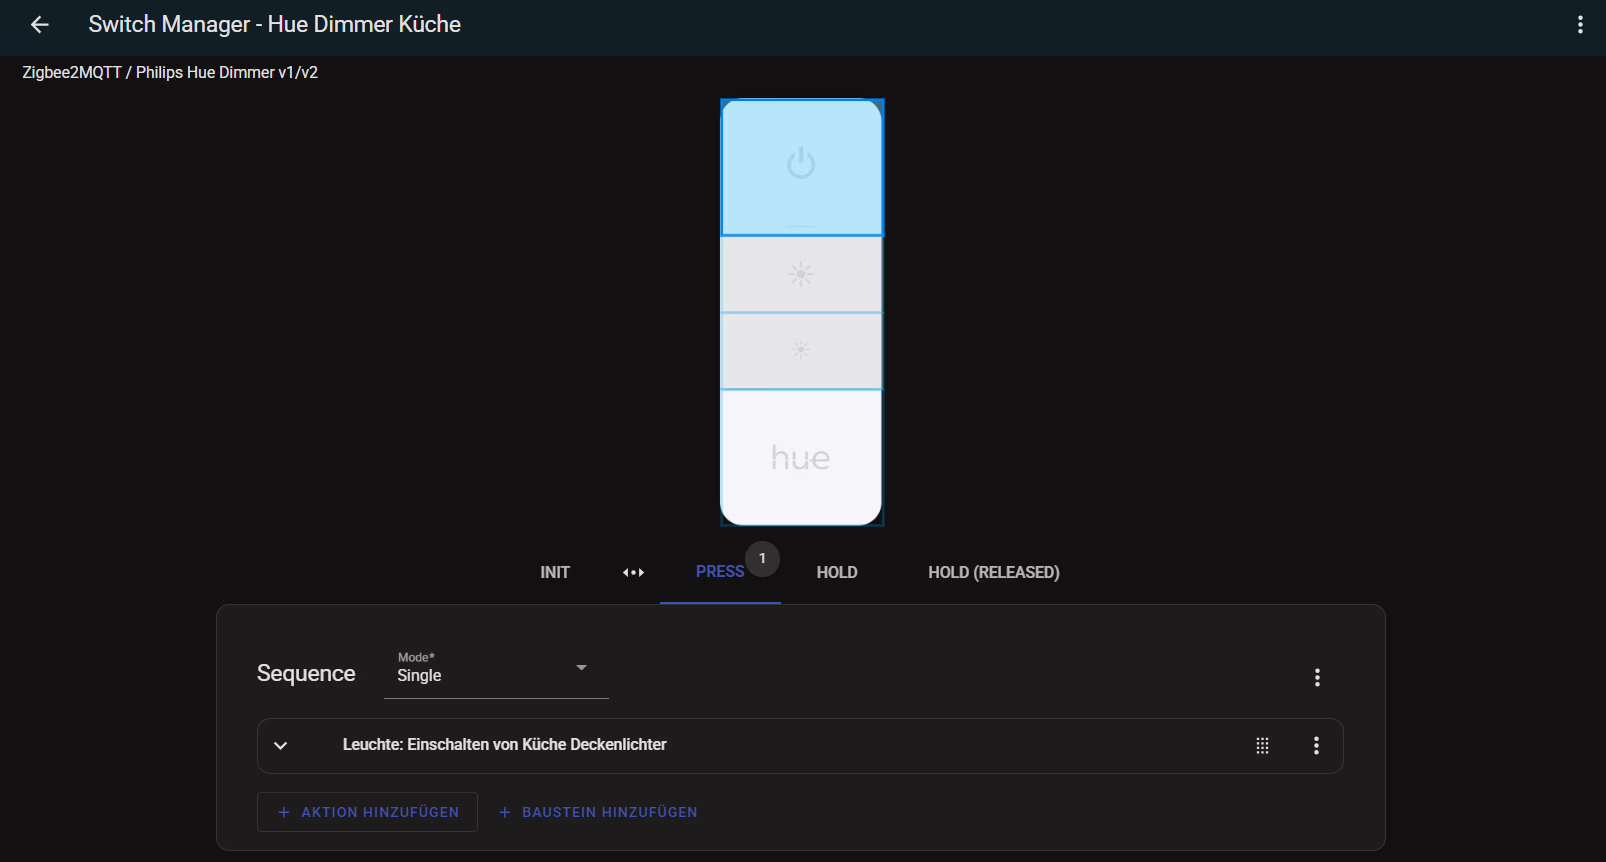
The Switch Manager is a User-friendly, centralized component for Home Assistant. It offers you an interface with which you can Clearly configure all actions of wireless switches no matter whether it is Zigbee, Z-Wave or other protocols.
Instead of defining each device individually in YAML, you simply use the Switch Manager:
"If I press button A1 twice, the living room light should be dimmed."
Done.
What makes the Switch Manager special
🔹 Central administration:
You no longer have to click through several automations to find out which switch does what. The Switch Manager shows you All configurations at a glance.
🔹 User interface instead of YAML:
You create and edit your switch actions conveniently via the Home Assistant interface. No more errors due to typos in YAML.
🔹 Intelligent allocation:
The Switch Manager automatically recognizes the supported key events of your devices. This means you know immediately whether "double-click" or "long press" is possible, for example.
🔹 Debugging made easy:
The component offers you a structured display of all events - ideal if something does not work as desired.
👉 Take a look at the complete function overview directly on GitHub to.


For whom is the Switch Manager worthwhile?
- If you Several wireless switches uses.
- If you Adapt actions quickly and flexibly would like.
- If you no longer feel like inscrutable YAML automations have.
- If you More overview and control want.
Installation of HACS and integration of Switch Manager in Home Assistant
Step 1: Installing HACS in Home Assistant
Home Assistant Community Store (HACS) is a custom add-on for Home Assistant that provides access to a variety of custom integrations and plugins developed by the community. How to install HACS:
- Check requirements: Make sure that your Home Assistant is ideally up to date.
- Download Execute script: Open a terminal for the Docker container version or the core version.
- Docker: Dial into the container with:
docker exec -it homeassistant bashor (similar) - Core: Switch to the user who is running Home Assistant
- Execute the following command for both variants:
wget -O - https://get.hacs.xyz | bash -
- Docker: Dial into the container with:
- Restarting the Home Assistant: After the files have been copied, restart Home Assistant.
- Integrate HACS into Home AssistantGo to "Configuration" > "Integrations" > "Add" in the Home Assistant interface and search for HACS. Add it and enter your GitHub token if prompted.
For the supervised version, please refer to the Documentation of HACS itself to read about the installation.
Step 2: Add Switch Manager integration via HACS
Once HACS is installed, you can simply add Switch Manager:
- Open HACS: Go to HACS in the Home Assistant interface.
- Search for integrationClick on "Integrations" and use the search function to search for "Switch Manager".
- Install Switch ManagerFind Switch Manager in the list and click on "Install". This will add the integration to your Home Assistant.
- Restarting the Home Assistant: Start Home Assistant again to apply the changes.
- Configuring the Switch ManagerAfter the restart, you can set up Switch Manager via "Configuration" > "Integrations" in Home Assistant and then customize it via the sidebar with the Switch Manager entry.
Conclusion
With these steps, you have successfully installed HACS in your Home Assistant and added the Switch Manager integration. This powerful combination opens up a world of additional features and customizations that have been and are being developed by the Home Assistant community. More blog posts and videos on useful integrations to follow. If you don't want to miss out, subscribe to my YouTube channel!
YouTube video implementation
Conclusion: A must for every smart home control center
With the Home Assistant Switch Manager you get a tool that will significantly tidy up your smart home. Finally you can Control all switch events centrallywithout getting lost in the YAML jungle.
Try it out - and bring structure to your keystrokes!


2 Comments
Michael · 28. October 2025 at 15:15
How does it work if the switch is connected via a tuya gateway, for example?
I selected ZHA to be able to select the blueprint and then entered the deviceid, then created a simple task (switch on light).
But even if I start the task in the switch manager, the light is not switched on. The switch reacts to state_changed in developer tools
Sascha Brockel · 28. October 2025 at 21:46
Hi, do you have one of the devices for which a blueprint exists? Ideally, then really press the button so that it recognizes the event itself, but I assume you've already done that, haven't you?