Estimated reading time: 10 minutes
Would you like to finally make your home smart - but without any conspicuous plug modules or visible technology? Then the Refoss R11 Smart Relay Switch just the right tool for you. This small flush-mounted relay disappears into the wall and makes existing sockets or light switches intelligent - without any additional devices or design compromises.
In this article you will find out:
- Which practical automations are possible
- Why a smart relay is the clever alternative to smart plugs
- How the Refoss R11 works
- What technical details you should know
- How to install it and what you need to bear in mind
For detailed instructions and an explanation of all configuration options, I recommend the YouTube video linked below. In this video, every single setting is explained in detail so that you receive comprehensive instructions for the exact setup. You can find any code from the video in this article so that you can use it directly without having to type it in.
💡 Why a smart relay?
If you already use smart devices or want to start using them, you're probably familiar with smart plugs - those adapters that you simply plug into the socket. Sounds simple, but is often Visually disturbingespecially if you want to furnish your home in a minimalist or unobtrusive way.
A Smart relays like the Refoss R11 has decisive advantages over conventional smart plugs:
- ✅ Invisible integration: The relay is installed in the flush-mounted box behind your light switch or socket - you can't see it, but you can feel the full smart home convenience.
- ✅ Retention of existing switches/designs: You can continue to use your normal switches or sockets - the design remains the same.
- ✅ Central control & automation: You can control your devices flexibly via the app or voice control without being limited to one manufacturer.
- ✅ Smart home integration without a gateway: The relay works via WLAN - so you need No additional bridge or control center.
⚙️ Technical details of the Refoss R11
Based on the Refoss Open API Documentation (see docs.refoss.net) and supplementary manufacturer information:
- Dimension: approx. 42 × 42 × 20 mm - fits into most flush-mounted boxes (at least 45 mm recommended)
- Supply: 100-240 V AC, 50/60 Hz
- Max. switching load: 10 A / ≈ 2300 W
- WLAN: 2.4 GHz (no 5 GHz)
- Network protocols: JSON-RPC via HTTP, WebSocket or MQTT (according to Open API)
- Compatibility: Apple HomeKit, Amazon Alexa, Google Assistant
- App control: via Refoss or Meross app, app scenes & timer, no bridge required
- Voice control: Siri, Alexa, Google Assistant
- Mode: Push-button or switch mode (adjustable)
- Protection: Overload and overvoltage protection (according to manufacturer)
- Open API capability: Full JSON-RPC access locally - ideal for developers/automated control without the cloud
➡️ You can find more technical information directly from the manufacturer:
👉 Product page Refoss R11
10% Discount on Refoss R11
You get 10% discount for the Refoss R11 via my link: https://refoss.net/products/smar-relay-switch-r11?ref=sashb
🧠 Why you should use the Refoss R11 with Home Assistant
- 100 % local control Without the cloud - affordable, secure, reliable
- Full access to the Open API, WebSocket, HTTP, MQTT - unlimited automation options
- Automatic device detection after installation - no manual IP entry
- Compact, compatible with HomeKit & HA - ideal in mixed smart home environments
What is Home Assistant?
Home Assistant is an open source platform for home automation that aims to connect and centrally control all devices in the home. It is designed to provide a unified user interface and simple, flexible control for a variety of smart home devices from different ecosystems. Here are some points in favor of Home Assistant:
- CompatibilityHome Assistant supports thousands of devices and services from various manufacturers, including lighting, air conditioning, heating, cameras, weather sensors, voice assistants and more.
- Local controlUnlike many commercial smart home platforms that rely on cloud services, Home Assistant runs locally on your network. This means increased privacy and reliability, as your smart home devices work even without an active internet connection.
- Automation and scenesOne of the main features of Home Assistant is the ability to create complex automations and scenarios. For example, you can have lights switch on automatically when it gets dark or turn on the heating when the temperature falls below a certain level.
- Simple user interfaceHome Assistant offers a user-friendly interface that makes it easy to monitor and control devices. This interface is fully customizable.
- Integration with voice assistantsHome Assistant can be integrated with voice assistants such as Amazon Alexa or Google Assistant to enable voice-controlled control of your smart home devices.
- Open source and community-drivenSince Home Assistant is open source, it is supported by an active community that is constantly developing new integrations and improving existing ones.
- Data protection and securityAs a locally running platform, Home Assistant has the advantage that the data remains within its own network. This protects privacy and increases security compared to cloud-based solutions.
In summary, Home Assistant is a powerful and flexible solution for those who want to design their own smart home and control their devices centrally, regardless of the manufacturer or ecosystem.


🛠️ Installation: This is how it works
Installation is simple - as long as you Basic knowledge of electrical engineering have. Otherwise, you should have the installation carried out by a qualified electrician. Here is an overview of the most important steps:
- Switch off power & fuse! Safety first - always trip the circuit breaker.
- Remove the switch or socket: You need access to the flush-mounted box.
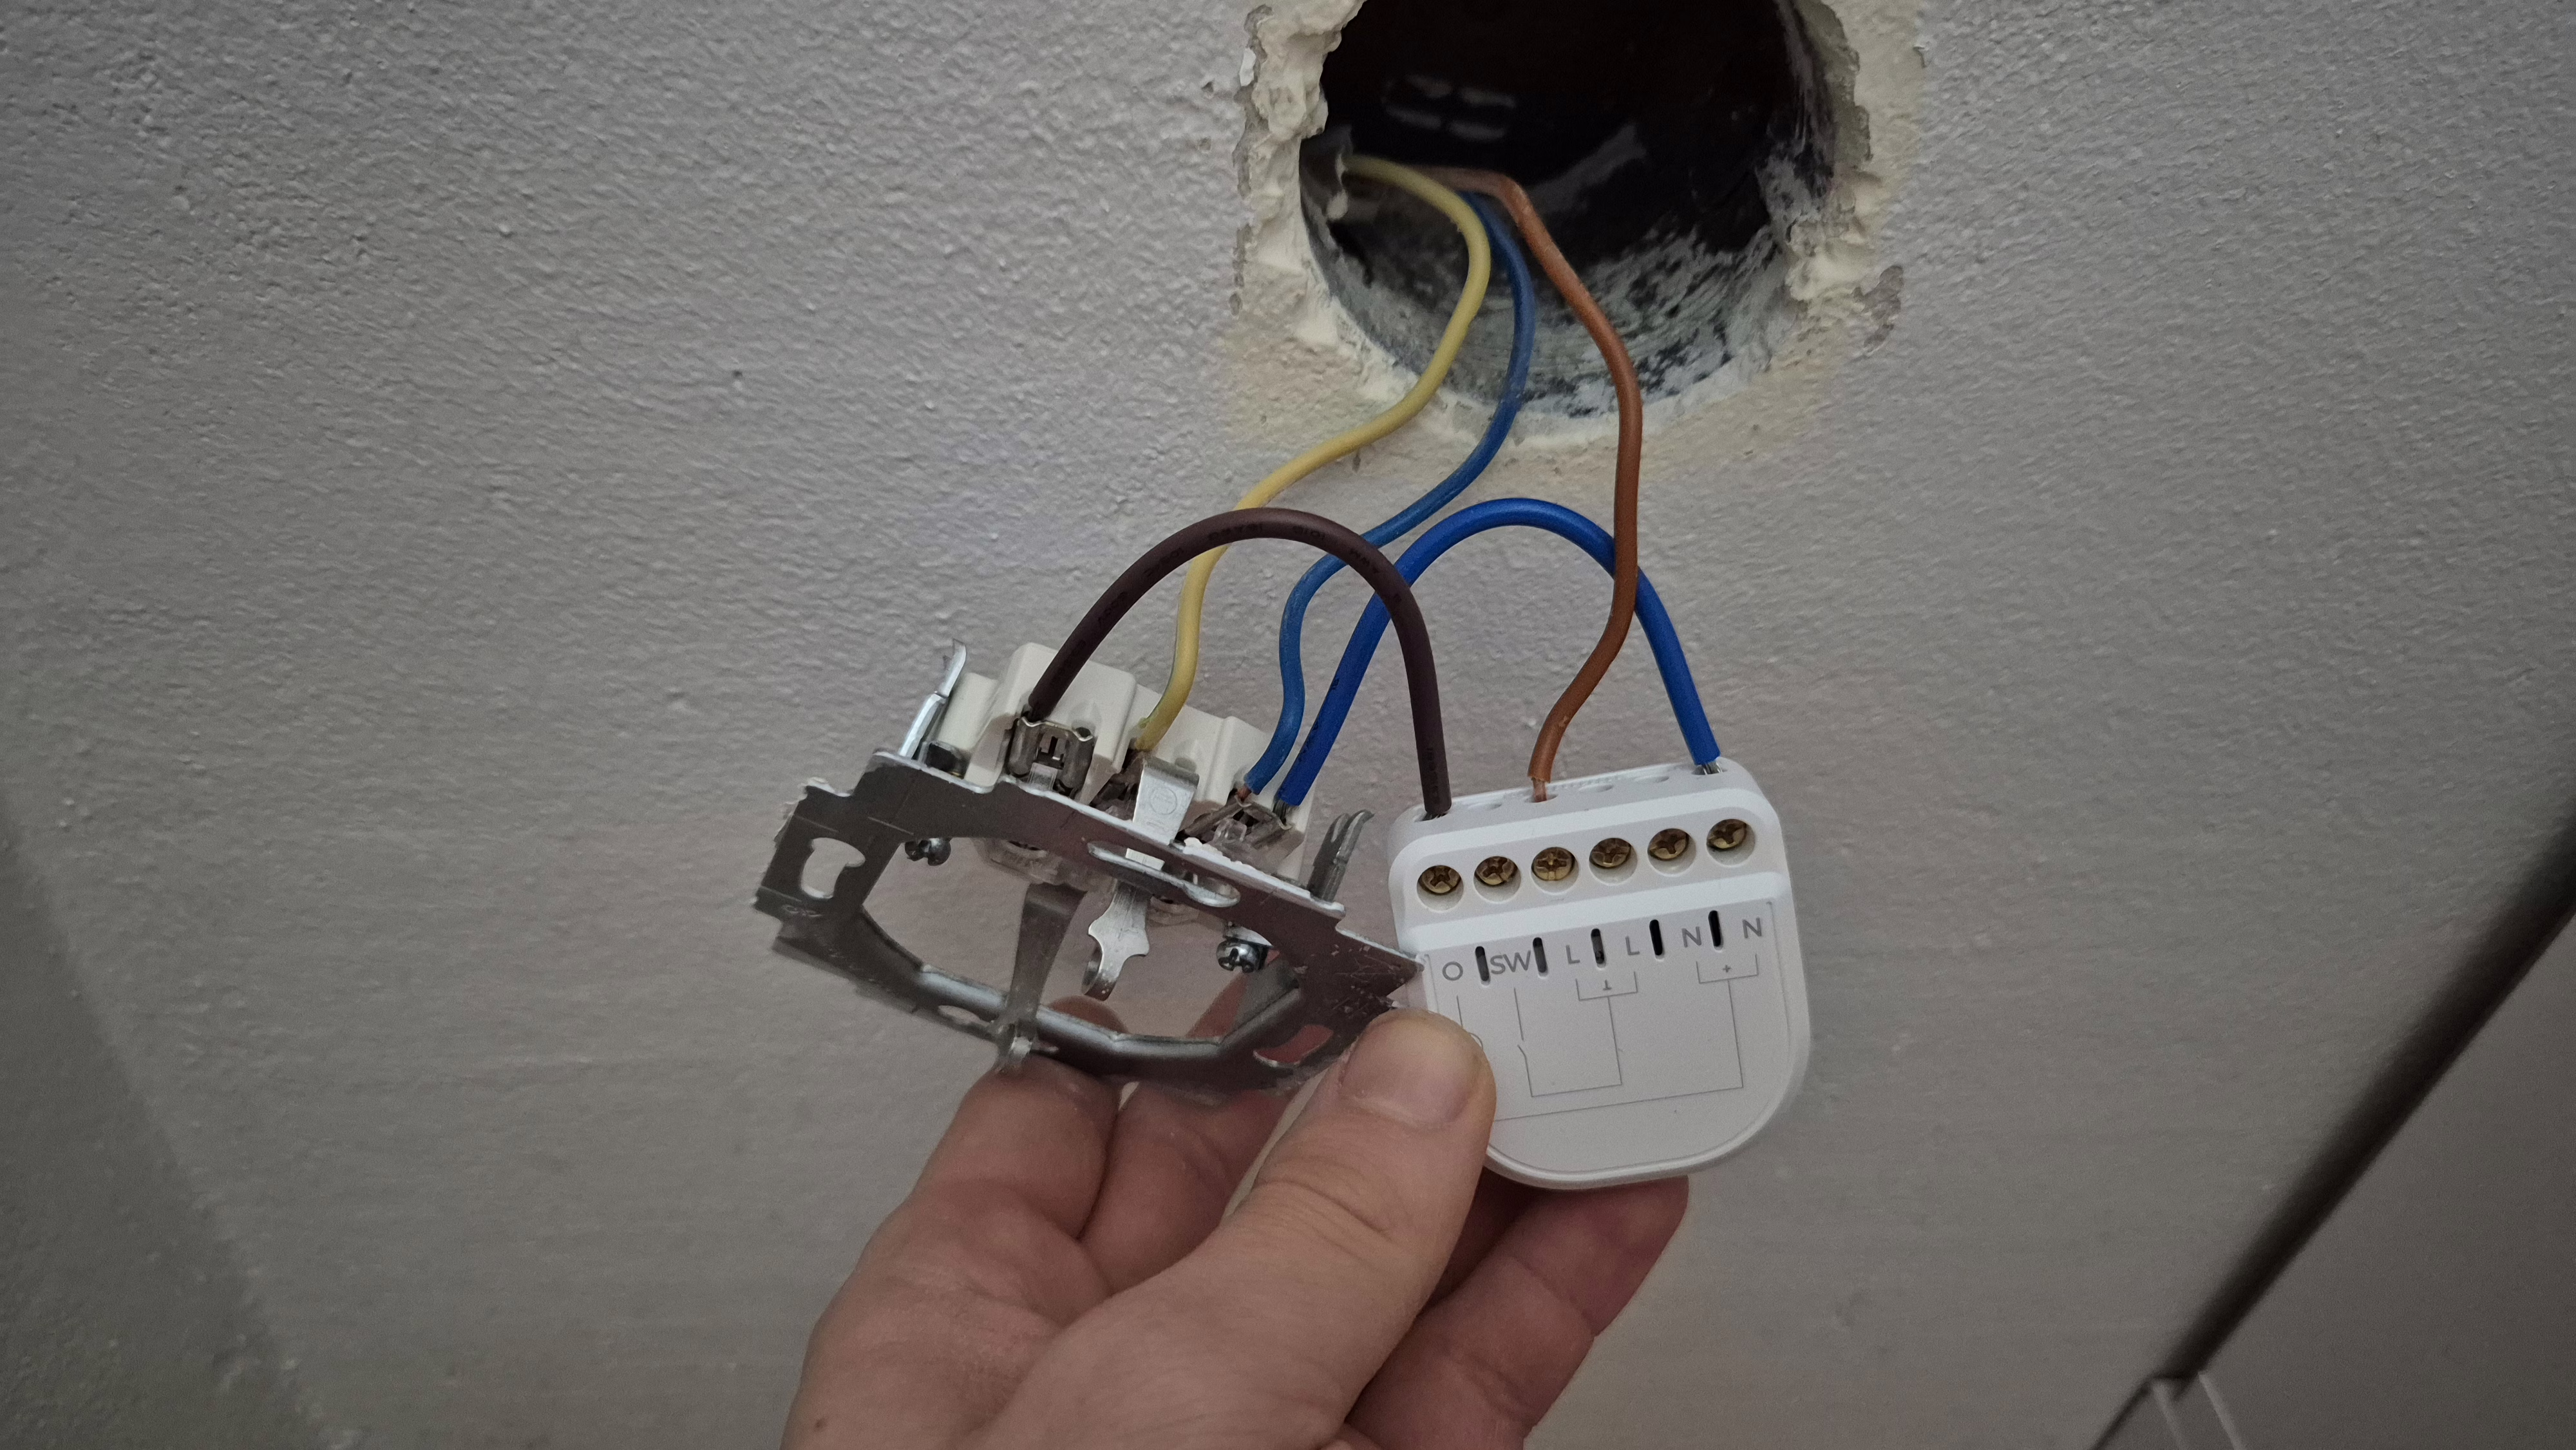
- Wire the relay:
- The Refoss R11 requires L (phase), N (neutral conductor) and a connection for the switch contact (S1/S2).
- The wiring depends on the intended use (e.g. socket outlet or light switch).
- Insert the relay into the box: Make sure there is enough space - 45 mm depth is ideal.
- Switch the power back on & connect the app: Now you can connect the R11 via the Refoss App or directly via Apple HomeKit add
- Test and configure: Check switch function, set up automations.
🛑 Important: Electrical installations in the 230V range may only by qualified specialists must be carried out. Danger to life due to improper installation!
Installation of HACS and integration of Refoss RPC in Home Assistant
Incidentally, it also makes sense to integrate Meross LAN from the HACS. This offers a few other entities for the same devices as Refoss RPC.
Step 1: Installing HACS in Home Assistant
Home Assistant Community Store (HACS) is a custom add-on for Home Assistant that provides access to a variety of custom integrations and plugins developed by the community. How to install HACS:
- Check requirements: Make sure that your Home Assistant is ideally up to date.
- Download Execute script: Open a terminal for the Docker container version or the core version.
- Docker: Dial into the container with:
docker exec -it homeassistant bashor (similar) - Core: Switch to the user who is running Home Assistant
- Execute the following command for both variants:
wget -O - https://get.hacs.xyz | bash -
- Docker: Dial into the container with:
- Restarting the Home Assistant: After the files have been copied, restart Home Assistant.
- Integrate HACS into Home AssistantGo to "Configuration" > "Integrations" > "Add" in the Home Assistant interface and search for HACS. Add it and enter your GitHub token if prompted.
For the supervised version, please refer to the Documentation of HACS itself to read about the installation.
Step 2: Add Refoss RPC integration via HACS
Once HACS is installed, you can simply add Refoss RPC:
- Open HACS: Go to HACS in the Home Assistant interface.
- Search for integrationClick on "Integrations" and use the search function to search for "Refoss RPC" or click here:
- Install Refoss RPCFind Refoss RPC in the list and click on "Install". This will add the integration to your Home Assistant.
- Restarting the Home Assistant: Start Home Assistant again to apply the changes.
- Configure Refoss RPCAfter restarting, you can set up and customize Refoss RPC via "Configuration" > "Integrations" in Home Assistant.
Conclusion
With these steps, you have successfully installed HACS in your Home Assistant and added the Refoss RPC integration. This powerful combination opens up a world of additional features and customizations that have been and are being developed by the Home Assistant community. More blog posts and videos on useful integrations to follow. If you don't want to miss it, subscribe to my YouTube channel!
✅ 5 clever automations with the Refoss R11 - based on consumption
🔁 1st washing machine ready message
You can recognize when the washing machine is finished by measuring its power consumption via a smart socket with energy monitoring. As soon as consumption drops significantly (e.g. at the end of the spin cycle), you will receive a notification on your smartphone. At the same time, the Refoss R11 can automatically switch off the socket to prevent standby consumption.
🌡️ 2. Activate fan automatically in heating mode
If an infrared heating panel or fan heater is used, you can also detect its activity via the power consumption. As soon as the consumption rises above a certain value (e.g. when the device is heating), Home Assistant activates the Refoss R11 to switch on an additional fan or circulation pump, for example - automatically and in line with the heating output.
3. switching off forgotten devices
Appliances such as an iron or hotplate can be dangerous if left unattended for long periods of time. You can use an ammeter to detect if the appliance is drawing high power for a long time. Home Assistant can then automatically switch off the Refoss R11 and send you a warning - so you avoid the risk of fire or unnecessary power consumption.
4. automatically switch off the light when not in use
Some lamps or lighting systems are accidentally left on even though they are hardly used - this can also be detected by very low power consumption (e.g. less than 3 watts). If consumption remains low for a longer period of time, Home Assistant can switch off the light via the Refoss R11 to save energy.
🛋️ 5. TV-controlled ambient lighting
If your TV is connected via a smart socket with power metering, Home Assistant can detect whether you are watching TV. As soon as the TV is switched on and consumes power, the backlight or an Ambilight is automatically activated via the Refoss R11. If the TV is switched off later, the light is automatically deactivated again - without any manual intervention.
YouTube video implementation
🤝 Community & exchange
Refoss actively supports the DIY and home assistant community. If you have feedback or would like to exchange ideas with others, be sure to stop by here:
Every experience, automation or improvement idea helps other smart home fans!
🧠 Conclusion: small technology, big impact
The Refoss R11 is a real game changer for anyone who wants to make their sockets or light switches smart - without visible technology or compromising on design. Thanks to the WLAN connection, support for all major voice assistants and the option of flush-mounted installation, it is Ideal for your minimalist, intelligent home.
If you are looking for a discreet, powerful and future-proof solution - then the Refoss R11 is your smart partner.


0 Comments