Estimated reading time: 9 minutes
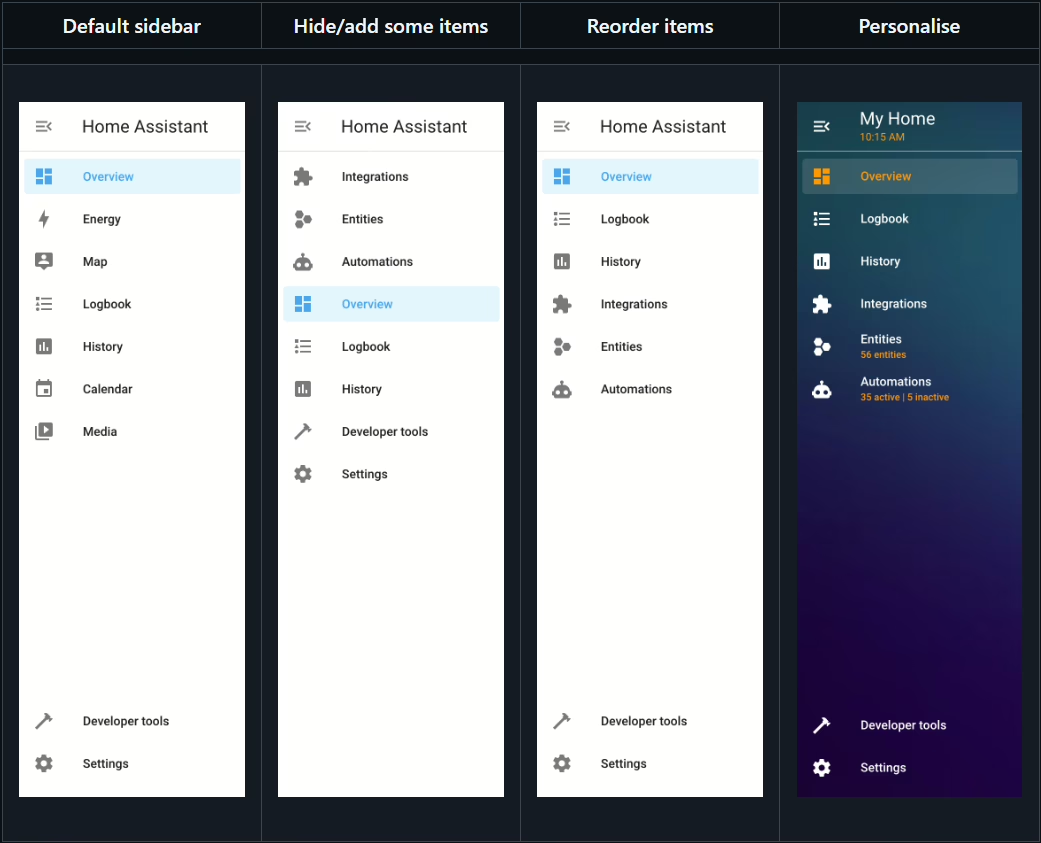
As a Home Assistant user, you certainly want a user interface that meets your individual needs. Home Assistant offers with panel_custom has its own option for sidebar customization, but this is very limited in its functions. With panel_custom you can only add your own menu items and customize icons. A real restructuring of the sidebar or the targeted hiding of entries is not possible.
Here comes the Custom sidebar plugin comes into play. It offers you much more flexibility: you can change the order of the elements, display certain menu items for specific users or devices and even customize the design. This gives you a sidebar that is precisely tailored to your requirements.
For detailed instructions and explanations of all configuration options, I recommend watching the YouTube video linked below. This video goes into detail about each individual setting, providing you with comprehensive instructions on how to set everything up correctly. Any code from the video can be found in this article, so you can use it directly without having to type it out.
What is Home Assistant?
Home Assistant is an open-source platform for home automation that aims to connect all devices in the home and control them centrally. It was developed to provide a unified user interface and simple, flexible control for a wide range of smart home devices from different ecosystems. Here are some points in favor of Home Assistant:
- CompatibilityHome Assistant supports thousands of devices and services from various manufacturers, including lighting, air conditioning, heating, cameras, weather sensors, voice assistants and more.
- Local controlUnlike many commercial smart home platforms that rely on cloud services, Home Assistant runs locally on your network. This means increased privacy and reliability, as your smart home devices work even without an active internet connection.
- Automation and scenesOne of the main features of Home Assistant is the ability to create complex automations and scenarios. For example, you can have lights turn on automatically when it gets dark, or turn on the heating when the temperature drops below a certain level.
- Simple user interfaceHome Assistant offers a user-friendly interface that makes it easy to monitor and control devices. This interface is fully customizable.
- Integration with voice assistantsHome Assistant can be integrated with voice assistants such as Amazon Alexa or Google Assistant to enable voice-controlled control of your smart home devices.
- Open source and community-drivenSince Home Assistant is open source, it is supported by an active community that is constantly developing new integrations and improving existing ones.
- Data protection and securityAs a locally running platform, Home Assistant has the advantage that the data remains within its own network. This protects privacy and increases security compared to cloud-based solutions.
In summary, Home Assistant is a powerful and flexible solution for those who want to design their own smart home and control their devices centrally, regardless of the manufacturer or ecosystem.
Installation of HACS and integration of Custom Sidebar in Home Assistant
Step 1: Installing HACS in Home Assistant
Home Assistant Community Store (HACS) is a custom add-on for Home Assistant that provides access to a variety of custom integrations and plugins developed by the community. How to install HACS:
- Check requirements: Make sure that your Home Assistant is ideally up to date.
- Download Execute script: Open a terminal for the Docker container version or the core version.
- Docker: Dial into the container with:
docker exec -it homeassistant bashor (similar) - Core: Switch to the user who is running Home Assistant
- Execute the following command for both variants:
wget -O - https://get.hacs.xyz | bash -
- Docker: Dial into the container with:
- Restarting the Home Assistant: After the files have been copied, restart Home Assistant.
- Integrate HACS into Home AssistantGo to "Configuration" > "Integrations" > "Add" in the Home Assistant interface and search for HACS. Add it and enter your GitHub token if prompted.
For the supervised version, please refer to the Documentation of HACS itself to read about the installation.
Step 2: Add custom sidebar integration via HACS
After HACS is installed, you can simply add Custom Sidebar:
- Open HACS: Go to HACS in the Home Assistant interface.
- Search for integrationClick on "Integrations" and use the search function to search for "Custom Sidebar".
- Install custom sidebarFind Custom Sidebar in the list and click on "Install". This will add the integration to your Home Assistant.
- Adjustment in
configuration.yaml: To ensure that the custom sidebar is also included, we need to add something in theconfiguration.yamladd. Depending on whether you want to use YAML or JSON for your configuration file later, there is a small difference (I recommend YAML)- YAML:
frontend:
extra_module_url:
- /hacsfiles/custom-sidebar/custom-sidebar-yaml.js - JSON:
frontend:
extra_module_url:
- /hacsfiles/custom-sidebar/custom-sidebar-json.js
- YAML:
- Restarting the Home Assistant: Start Home Assistant again to apply the changes.
Conclusion
With these steps, you have successfully installed HACS in your Home Assistant and added the Custom Sidebar integration. This powerful combination opens up a world of additional features and customizations that have been and are being developed by the Home Assistant community. More blog posts and videos on useful integrations to follow. If you don't want to miss out, subscribe to my YouTube channel!
Configuration of the sidebar
After installation, you can customize the sidebar using a configuration file. To do this, create a configuration file in the /www/ a file called sidebar-config.yaml or sidebar-config.jsondepending on whether you prefer YAML or JSON. You can find an example configuration here.
I recommend that you create a YAML because, unlike JSON, you can also write comments there and comment out code if necessary. The file MUST be in the location, otherwise it will not be recognized. You cannot change this.
Example for sidebar-config.yaml:
title: Sascha's HA
subtitle: Version {{ states("sensor.current_version") }}
sidebar_editable: true
hide_all: false
order:
  - item: Overview
    order: 0
  - item: Editor
    order: 1
  - item: overview
    order: 2
  - new_item: true
    item: Integrations
    href: /config/integrations
    info: "{{ states | map(attribute='entity_id') | map('device_attr', 'identifiers') | reject('none') | map('list') | map('first') | map('first') | reject('undefined') | unique | list | count }} via UI"
    icon: mdi:puzzle
    order: 3
  - new_item: true
    item: Entities
    href: /config/entities
    # icon_color: red
    info: "{{ states('sensor.entities') }} Entities"
    icon: mdi:hexagon-multiple
    order: 4
  - new_item: true
    item: Automations
    href: /config/automation
    info: "Active: {{ states.automation | selectattr('state', 'eq', 'on') | list | count }} | Inactive: {{ states.automation | selectattr('state', 'eq', 'off') | list | count }}"
    icon: mdi:robot
  - item: 'Settings'
    icon: 'mdi:cog'
    order: 3
  - item: Frigate
    icon: phu:frigate
    order: 7
  - item: ESPHome
    icon_color: var(--primary-color)
    order: 7
  - item: Grocy
    icon_color: rgb(67, 113, 169)
    order: 7
  - item: hacs
    info: "{{ states.update | selectattr('attributes.supported_features', 'search', '23') | list | count }} downloaded"
    notification: |
      {%- set count = 0 %}
      {%- for e in expand(states.update) %}
        {%- set identifiers = device_attr(e.entity_id, 'identifiers') %}
        {%- if e.state == 'on' and identifiers is not none and 'hacs' in identifiers | join(',') %}
          {%- set count = count + 1 %}
        {%- endif %}
      {%- endfor %}
      {{ "" if count == 0 else count }}
    order: 7
  - item: Energy
    info: "Today | {{ states('sensor.stromverbrauch_daily') | round(2) }} kWh"
    order: 8
  - item: Tablet
    info: "{{ states('sensor.fire_tablet_battery')}} %"
    href: /dashboard-tablet/default_view?disable_km
    order: 9
In this example we have:
- Set the title of the sidebar to "Sascha's HA" and the subtitle automatically shows the current Home Assistant version via the sensor
sensor.current_versionintegrated. This is part of the Home Assistant Integration version. - The sidebar editable so that entries can be customized later directly in the browser.
- The standard entries such as Overview and Editor and rearranged their order.
- Several new menu items created, including Integrations, Entities and Automationswhich display dynamic information - such as the number of entities, active automations or available integrations. You can get these sensors through a further custom integration from HACS called Spook. You can find the blog article here: Spook - Home Assistant Must Have Extension
- Existing add-ons such as Frigate, ESPHome and Grocy integrated into the sidebar and sometimes provided with their own colors or icons to highlight them visually.
- For HACS an intelligent display that shows both the number of downloaded updates and a Notification badge for available updates.
- One section Energy which displays the daily electricity consumption in kilowatt hours.
- One entry Tablet which shows the current battery status of the Fire tablet and takes you directly to the customized tablet dashboard.
- This creates a sidebar that is not only clearer and more informative, but also displays system and status data in real time - perfect for a personalized smart home interface.


Customization options
With the Custom Sidebar Plugin for Home Assistant, you have numerous customization options at your disposal:
- Title and subtitleSet individual titles and subtitles for the sidebar.
- Sequence of the elements: Determine the order in which the elements are to be displayed.
- IconsAssign specific icons to the sidebar elements.
- VisibilityHide certain elements for all or only for certain users.
- Standard path: Specify which path is opened by default when Home Assistant is loaded.
You can find a detailed overview of all configuration options in the Documentation.
Customization of the design
In addition to the functionality, you can also customize the appearance of the sidebar:
- ColorsChange the colors of titles, icons, texts and backgrounds.
- BackgroundsSet individual background images or colors for the sidebar and its elements.
- NotificationsCustomize the colors of notification indicators.
These design options allow you to customize the look of the sidebar to match your preferred theme. You can find more information on this here.
Exceptions for certain users or devices
With Custom Sidebar, you can specify that certain sidebar configurations are only used for certain users, devices or browsers. This is particularly practical if, for example, you want to display a different sidebar for admins than for normal users.
These exceptions are configured via the exceptions in the sidebar-config.yaml. You can define various criteria according to which a specific sidebar configuration is displayed or hidden:
- By userAssign different sidebar layouts to specific users.
- By browserShow a certain sidebar only in certain browsers.
- By deviceDisplay a customized sidebar for smartphones, tablets or desktops.
- By languageCustomize the sidebar based on the user's language setting.
YouTube video implementation
Conclusion
The Custom Sidebar plugin allows you to customize the Home Assistant sidebar perfectly to your needs. Whether you change the order, hide menu items or customize the design - with this plugin you have full control over your sidebar. The exceptions that allow you to target different user groups are particularly practical. Try it out and optimize your Home Assistant experience!


0 Comments